SnapFix: the official newsletter of Mosaic Moments®
MOSAIC MOMENTS® PRESENTS:
"Jungle Cruise 2025" by Jodi Benson - Pattern #1093
Hello
Have you ever hesitated before making that first cut, worried you might "ruin" a photo? You’re not alone!
Almost every scrapbooker has felt
that little moment of panic. But here’s the good news—you’ve got the Basic Die Bundle, and that means cutting your photos just got foolproof!
With Mosaic Moments dies, you don’t have to stress about measuring, eyeballing, or
hoping for straight lines. These precision dies do all the hard work for you, ensuring perfectly cut photos that fit beautifully on the grid every time. No more wonky edges, no more wasted pictures—just crisp, professional-looking cuts that make your layouts shine!
In today’s
email, we'll walk you through simple steps for cutting your photos like a pro, plus a few troubleshooting tips in case you hit a snag.
Let’s get started!
Tami Potter
Easy and Foolproof!
"Breakfast in Richmond" by Jodi Benson - Pattern #1099
The Basic Die Bundle makes cutting photos easy and foolproof.
The Basic Die Bundle is perfectly sized to fit the grid marks on the Grid Paper so you never have to measure or trace again. Your mats and photos will be the perfect size, and it will be so quick—one pass through your die machine.
When you go to make your scrapbook page, your pattern will tell you the color of your die set to find the correct die, and you can either mark the sizes or simply lay your die on the grid to be sure you have the right size. The right die will cover the correct number of grid lines. When you want to make mats for your photos, like in the
layout above, you select the right layering die in the same colored set as the mat to crop your photos.
In each nested set of the Basic Die Bundle, there are dies that cover the grid marks completely and also dies that make a layer on top of that die cut. When
you want to make a matted photo, you take the die that covers the grid and make a mat or die cut with cardstock or patterned paper. Then you take the layering die and cut your photo. It's that easy to make matted photos like the ones above in Jodi's layout, "Breakfast in Richmond".
Using the Basic Die Bundle is a trouble-free and reliable way to cut your design elements perfectly and make your awe-inspiring Mosaic Moments layouts.
Let’s Talk About Photo-Cutting Fears
(And How to Get Past Them!)
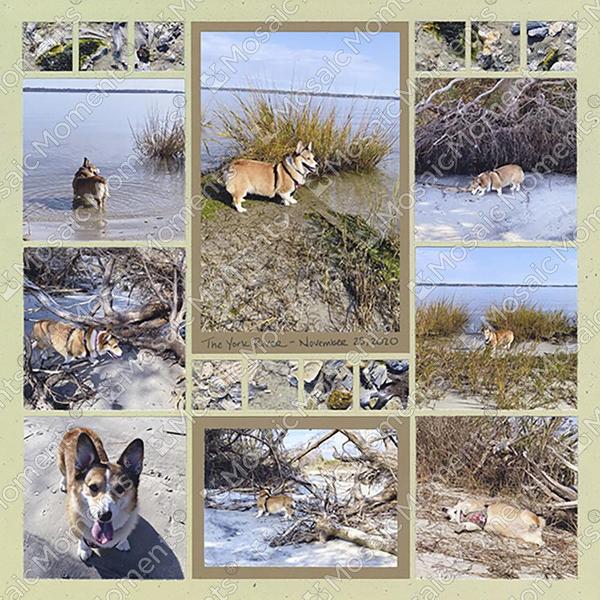
"Exploring the York River" by Paije Potter - Pattern #635
If the idea of cutting your photos makes you nervous—you’re not alone! It’s one of the most common hesitations we hear from beginners starting with Mosaic Moments. After all, your photos are special. Some
may be treasured prints you can’t easily replace.
But here’s the good news: there are simple ways to protect your memories while still creating layouts you’ll love.
Tip 1: Scan and Save If you’re working with older photos, try scanning them and saving digital copies before you start scrapbooking. That way, you can reprint them whenever you want—no pressure, no regrets!
Tip 2: Cropping Is Your Friend We promise—cropping isn’t about ruining your photos. It’s about focusing on what matters
most and getting rid of little distractions in the background. A well-cropped photo helps your layout come together beautifully. And sometimes, it even reveals a new, more artistic view you hadn’t noticed before!
Tip 3: Print to
Size If you’d rather not trim down a photo, try printing your photos to the exact sizes you need for your layout. That way, everything fits perfectly, and you don’t have to cut into any important parts of your image.
Tip 4: Use What You Have You can use already printed 4x6 photos—just choose a pattern that works well with your images. As you practice cropping, you’ll start to see what can be trimmed and what needs to stay. Don’t worry—it becomes second nature before you know it!
Designer Tip: Want to make future pages even easier? Start building good photo habits:
Take both vertical and horizontal shots
Capture
close-ups, mid-range, and wide views
Snap some textured shots (think bricks, flowers, leaves, wood grain)
And most importantly—take lots of photos!
You’ve got this—and we’re here cheering you on every step of the way!
Watch This YouTube Video for More Help Cutting With Your Dies:
Watch this video if you're unsure about using thin dies to make die cuts and to crop your photos. You'll also see Paije make a fun layout that you may want to try!
Troubleshooting Common Cutting Mistakes
"Jungle Cruise 2025" by Jodi Benson - Pattern #1093
Don’t worry if things don’t go perfectly the first time! Mistakes happen to everyone, and most of them are super easy to fix. Here’s a quick guide to help you troubleshoot some of the most common little
hiccups when cutting your photos and paper:
Tip 1: Line It Up with Care That old saying “measure twice, cut once” really comes in handy
here! Take a moment to double-check your die placement before running it through the machine. A little extra attention goes a long way—and the good news is, digital photos can always be reprinted if needed. But it always feels great when you get it just right the first time!
Tip 2: Use Washi Tape to Keep Your Die in Place If your die tends to shift while you’re cutting, try using a small piece of washi tape to hold it in place. Just make sure not to cover anything important on your photo, and test your tape to make sure it’s not too sticky. This trick helps keep everything steady while you roll!
Tip 3: Hide Tiny Mistakes Got a little sliver of white showing from a slightly misaligned cut? No worries! You can use a dark pen or an ink pad to gently color over the edge and make that white line disappear. It’s a quick fix that saves you from reprinting and still looks great.
Tip 4: Hearing a Crunch? Try This! If your die makes a loud cracking or crunching noise going through your machine—don’t panic! That’s normal. To smooth things out, try placing your die at a slight angle on the cutting plate. It helps the die roll through more easily and prevents the harsh sound.
Tip 5: Fix Warped Dies & Plates Over time, your dies or cutting plates will start to warp a bit. The fix? Just rotate your dies and plates each time you use them. Changing up the angle helps
everything wear more evenly and keeps your tools working smoothly for a long time.
See? Most little mistakes are easy to fix—and they’re all part of the learning process. The more you use your tools, the more confident you’ll feel.
Never miss an important Mosaic Moments® sale again!
On your phone, text just the word JOIN to the number 833-264-2066, and you'll be signed up to get a text message at the beginning of each snapncrop.com sale. You can stop receiving messages anytime by texting STOP. Message and data rates may apply.